


|

Bio Skin - the skinning tool you always wanted
| Page 1 | 2 |
| Note: All thumbnails will open a new
window with a larger image. |
| Envelope |
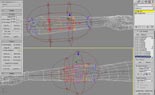
Figure 4
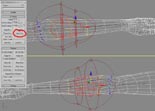
Figure 5 |
With the initial set-up all done, you will basically spend all your
time in one of two rollouts, either the Envelope rollout or the Vertices
rollout. As one would expect, it is best to adjust all your envelopes
first. Once it is clear that you need better control to get good deformation
of your character, switch to vertex mode in the skin modifier and
manually adjust the weights of individual vertices.
Within the Skin modifier, click on the "Edit Envelopes" button and
select one of the envelopes to edit. Adjust both the inner and outer
influence circles at both ends and if required, move both the start
and end points of the envelope. Figure
4 shows the lower right arm bone with its envelope adjusted (bottom
viewport) with the initial envelope settings being shown on the left
arm in the top viewport. You can make these adjustments either in
the viewports with the move tool or using some of the spinners in
the first part of the Envelope rollout in Bio Skin.
Then, once all the adjustments have been made and with that bone/envelope
still selected, click on the "Mirror Env" button and see that not
only was the envelopes mirrored but the overall start and end positions
of the envelopes was also mirrored (figure
5).
The rest of the buttons are basically for coping and pasting the envelope,
either from a memory buffer or to disk. But in the end, it's the "Mirror
Env" that will get the greatest workout. |
| Vertices |
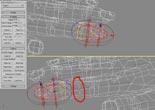
Figure 6

Figure 7 |
Once all the envelopes are have been set and mirrored, its time
to move on down to the vertex level. The Vertices rollout has a number
of buttons, but for this little overview, we are just going to look
at two of them. Which as it turns out are the two that I have used
most.
Now, while envelopes can do a pretty good job, they are never going
to cut it on small complicated areas of a mesh, like a hand for example.
Needless to say one doesn't really want to have to adjust all the
vertex weights for each finger joint on a hand and then have to manually
do it all over again for the other hand. So, make sure that "Vertices"
is check in the select section (just under the Edit Envelopes button)
in the Skin modifier and adjust the skin weighting of some vertices
around the area of a bone. In Figure
6, you can see in the bottom viewport where I have set a number
of vertices to full weight on the mesh. Not really how I would do
it full real, but as an example it makes it easier to see.
Once you have made all your vertex adjustments, click on the "Sel
Af. Verts" button. This will select all the vertices that the current
bones envelopes affect and any vertices that you have adjusted regardless
of if they are inside or outside of the envelopes. Next, click on
the "Mirror Mod" button, which will mirror the manually adjusted weights
of any of those selected vertices (figure
7).
You can do this as often as you like till the mesh deforms correctly,
though it is a good idea to always work on one side and mirror to
the other. Swapping and changing could have unpredictable results.
|
| Conclusion |
This has just been a short overview,
you should try out the other buttons on say a simple test file to
get a feel for what Bio Skin can do. Depending on your skinning needs
you may use most of Bio Skin, or only a few buttons all the time.
It should be noted that as part of the newly announced 3ds max 6,
that one of its new features is skin vertex mirroring, but hey, why
wait for max 6? |
| Page 1 |
2 |
|