

|

A Head of Hair - Part 2 (A Little Bit of Texture)
| Page 1 | 2 | 3 |
| Step 15 |
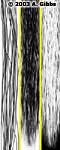
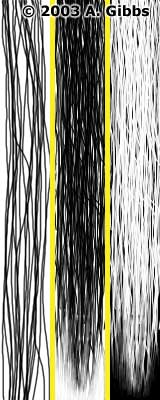
Figure 17 |
Now you need to remember that we are in fact painting an opacity
map here. So there are a couple of things that need to be done. First,
we want the end of the hair to taper off and end in a few strands
of hair. To do this, add another layer in Photoshop and paint in white
at the bottom of the map to slowly fade out the hair. Make sure that
the very bottom edges are solid white otherwise you will get a funny
halo at the ends of the hair. You can see what this looks like, along
with all the extra strand layers in the second image of figure
17. |
| Step 16 |
Figure 17 |
Its nearly done, but we have a problem, it's the wrong way around.
That is, for an opacity map, what we current have black, we want white
and vice verse. Basically it was easier to paint the hair as black
strands on a white background, so now, keeping the layered Photoshop
file, you need to save out a copy that is inverted. I tend to use
compressed TIF files for this. Once again figure
17 shows the final opacity map as its last image that I called
"hair_long2.tif". Make sure that you either started with a grayscale
file or convert it to grayscale before saving it as a TIF. |
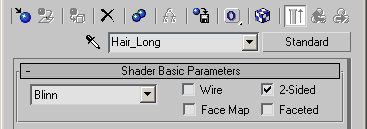
| Step 17 |
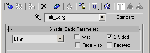
Figure 18 |
With the opacity map done, its time to switch back to 3ds max and create the material. As I noted before, I am currently using 3 materials, which use two different opacity maps. However, each material is basically just a copy of the original with a few minor changes. So I will fully go over a material set-up and then note the small changes for the others.
In an unused Material Editor slot, give the material the name "Hair_Long"
and set the shader to Blinn and make sure to check 2-Sided (figure
18).
|
| Step 18 |
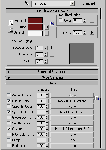
Figure 19 |
Some type of map will control most of the settings in the Blinn
Basic Parameters rollout. However, even though a map will control
the Specular Level, make sure to zero out both the Specular Level
and Glossiness spinners in the Specular Highlights section of the
basic Parameters (figure 19). Otherwise you
will end up with white highlights all over the hair, regardless of
what maps you may have set-up. You can also set the Diffuse/Ambient
colours to the general hair colour that you plan to use, however it
will matter very little since the Gradient map in the Diffuse Colour
map channel will control it. |
| Step 19 |
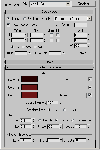
Figure 20 |
Within the maps section, apply a Gradient map to the Diffuse Colour
channel. The main reason for this is to apply a base colour to the
hair. This is basically what the colour of the hair will look like.
While you can use a light colour, something that is darker, like a
red or brown is easier to work with and hides "problems" in dark areas.
Since we applied "Generate Mapping Coords" when we first made the
basic plane for modelling the hair, we have an easy way to apply are
maps and know that they will map correctly despite how twisted the
hair may be. It should be on map channel 1 and clear the tile check
boxes and make sure that Show Map on Back is checked. As part of the
Gradient Parameters, set the colours from its darkest to the lightest.
This will basically make the hair go from dark, at the roots, to a
bit lighter at the ends. I also apply some noise to help break up
the general colour (figure 20). |
| |
|
| Page 1 |
2 | 3 |
|